Resources and Insights
Image


Filters

Content Type
Topics
Drupal Website Creation Guide for Beginners
Image

Drupal is a powerful, flexible and highly customizable content management system (CMS) that empowers creators to build anything from personal blogs to enterprise-level websites. But for beginners, the road to mastering Drupal can seem a bit overwhelming.
But don’t worry – we’ll break down the process of creating a website in Drupal in simple steps! Whether you're building your first website or migrating from another CMS, this guide will show you exactly how to get your Drupal site up and running smoothly.
Getting started with Drupal: The basics
Drupal is a free, open-source CMS designed to manage complex content structures. Unlike most drag-and-drop site builders, Drupal also offers granular control over how your content is organized, displayed, and interacted with. This makes it ideal for content-heavy websites, educational institutions, nonprofits, and enterprise businesses. It provides:
- Flexibility – you can build custom content types, each with its own fields, and easily display your content in many ways with Drupal’s built-in Views module.
- Scalability – the CMS can handle everything from small blogs to massive enterprise platforms.
- Security – it’s one of the most secure CMSs, with a strong security team and regular updates.
- Community support – which enhances and extends Drupal through contributed modules and themes.
Step-by-step Drupal installation and hosting setup
Before you start the installation, you need to choose a hosting provider. While Drupal can be installed on various hosting platforms, choosing the right one is essential for your site's performance, security and reliability.
Pantheon is a fantastic choice, offering a platform that is optimized for Drupal. With features like one-click installation, automated backups and an easy-to-use dashboard, Pantheon makes setting up and managing your Drupal website incredibly simple. It takes care of a lot of the technical heavy lifting, allowing you to focus on building your site rather than dealing with complicated server configurations.
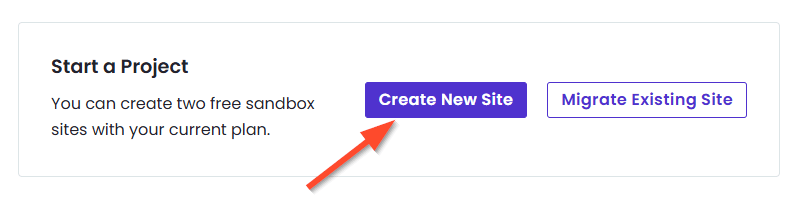
Once you’ve selected your hosting provider, the installation process is straightforward. If you’re using Pantheon, all you have to do is:
1. Click on Create New Site.
Image
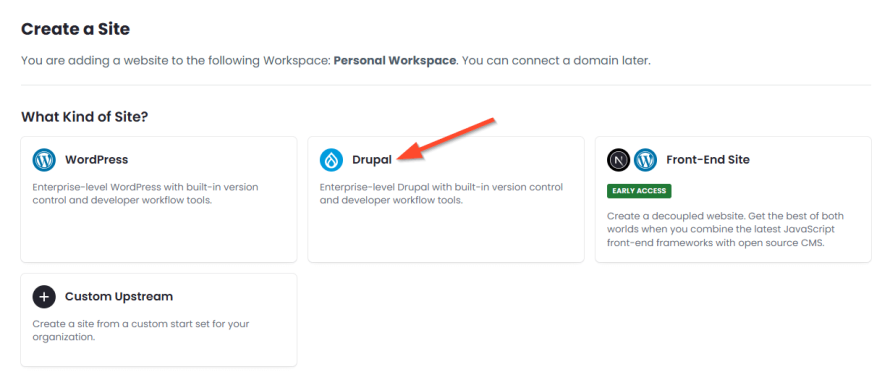
2. Select Drupal.
Image
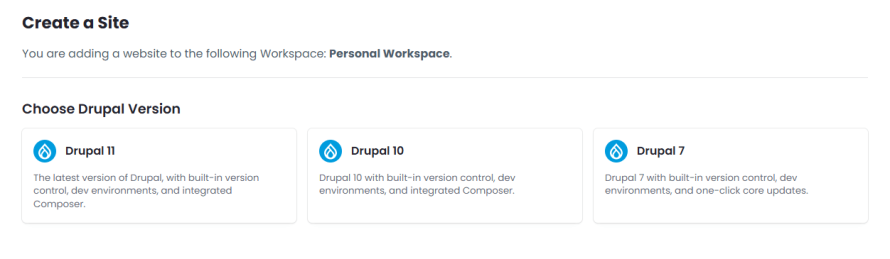
3. Choose the version you want. The current stable version is Drupal 10.
Image
That’s it – Pantheon will handle the rest!
However, if you’re using another host without one-click installation, then:
1. Head over to the official Drupal website and download the latest stable version. You’ll receive a compressed file, usually in a .tar.gz or .zip format.
2. Using an SFTP client (like FileZilla), upload the Drupal files to your server’s root directory.
3. Create a database. Drupal needs a database to store your site’s content and settings. Most hosting providers offer an easy-to-use interface for creating a new database, often through tools like cPanel or a custom dashboard. Remember the database name, username and password, as you’ll need them in the next step.
4. Open your browser and navigate to your site’s URL. You’ll be prompted to run the Drupal installation, which will guide you through configuring your site’s basic settings (language, site name, admin username, etc.)
Image
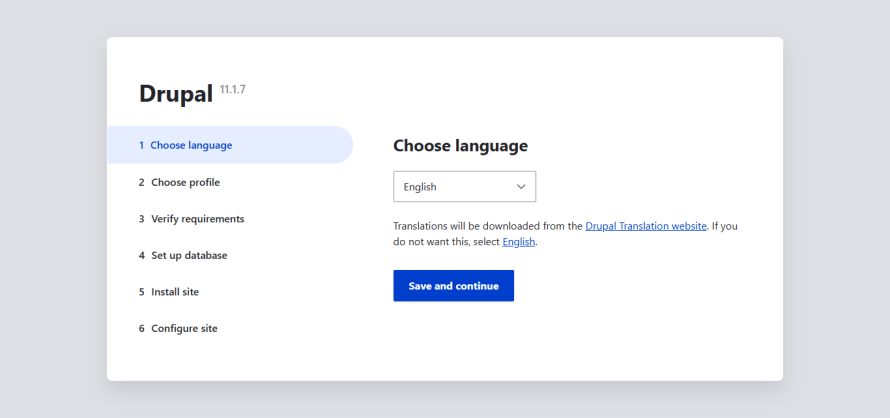
5. During the installation, Drupal will ask you to connect to the database you created earlier, so enter the database name, username and password. After that, Drupal will install itself automatically.
And congratulations! You’ve installed Drupal and are now ready to start customizing your site.
Navigating the Drupal dashboard
When you first log in to your Drupal site, you’ll land on the dashboard – your central hub for managing everything from content to users to site settings.
At the top of your screen, you'll see the admin toolbar.
Image

This is your main navigation for managing content, structure, appearance, configuration and user permissions. The most important sections for beginners are:
- Content – where you’ll create, edit and manage all of your site’s content. Whether it’s articles, pages or custom content types, this section is your go-to place for managing what appears on your site.
- Structure – where you’ll define your site's structure, including menus, content types, taxonomies and blocks. It’s a key area for organizing how your content is presented.
- Appearance – where you’ll install and manage themes that change the look and feel of your site. It’s also where you’ll make customizations to ensure your site is visually aligned with your brand.
- Configuration – where you’ll tweak site-wide settings, like site information, user permissions and date formats. It's the place for advanced customizations to enhance your site's functionality.
- Reports – where you’ll find useful insights into your site's health, including performance data, security updates and logs of system activity.
Now, it’s time to start populating your Drupal site with engaging content and organizing your pages.
Creating content in Drupal
Drupal’s content management system is powerful and flexible, giving you full control over what you publish and how it’s structured. For beginners, understanding how Drupal handles content types, fields, taxonomy, etc., is key to building a site that’s easy to manage and scale.
Content types
In Drupal, a content type defines what kind of information you want to collect and display, such as a blog post, an event, or a product. A Node is a single piece of content created using one of those templates. So, if you have a Blog Post or Product content type, every individual blog post or product you create is a node of that type. Each content type can have its own layout, fields, and settings.
The default content types include:
- Article – used for blog posts, news, etc.
- Basic Page – used for static pages like "About Us" or "Contact."
You can also create custom content types to fit your site’s needs. For example, you might create a content type called "Events" with fields for date, location and speaker.
Here’s how to create a new piece of content:
1. From your Drupal dashboard, go to the Content tab and click on the Add Content button.
Image
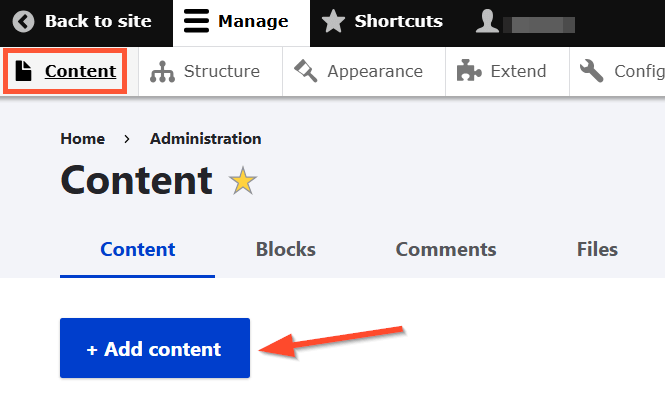
2. Drupal will prompt you to select a content type. Depending on your selection, you might need to enter a title, body text, images, tags and other content elements.
3. After adding your content, you can either save it as a draft or publish it directly. Also, Drupal allows you to schedule posts for future publication or manually publish them as needed.
With Drupal's flexibility, you can customize these fields later on to suit the specific needs of your website to optimize user experience and improve your Drupal site's SEO performance.
Taxonomy
Drupal uses taxonomies to categorize and tag content. You can create vocabularies (groups of terms) and then add them to your content types. For example, you might have categories like "Technology," "Design" or "Health" for blog posts or create product categories like "Electronics" and "Apparel" for an eCommerce store. Here’s how:
1. Go to Structure > Taxonomy.
Image
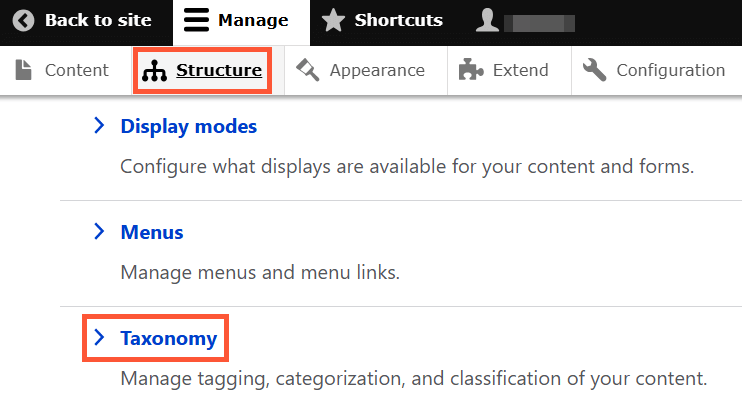
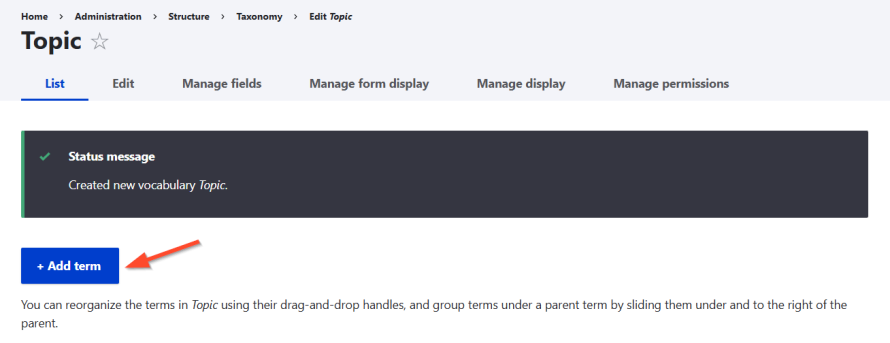
2. Click Add vocabulary, enter a name for it (e.g., “Topics”) and a description, then click Save.
Image
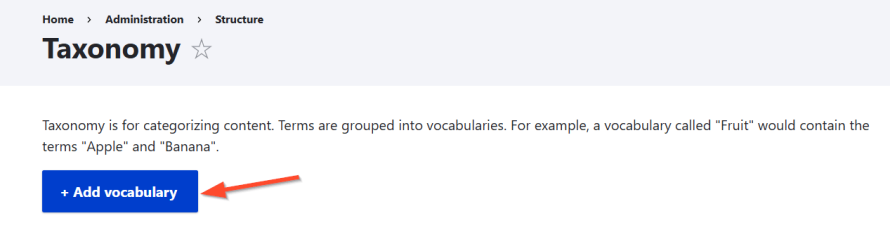
3. Click Add terms and enter your desired input (e.g., “Design,” “Marketing,” “Tech”).
Image
Building user-friendly navigation and site structure
A well-organized site is easier to manage and easier for visitors to explore. Thankfully, Drupal gives you powerful tools to build clear, intuitive navigation that improves user experience and supports SEO best practices.
Menus in Drupal are collections of links that help users navigate your site. By default, Drupal includes a Main navigation menu, but you can create custom menus as needed.
To add or edit menus:
- Go to Structure > Menus.
- Choose an existing menu (like Main navigation) or click Add menu.
- Add links by specifying:
- The title (e.g., “Services”).
- The link path (e.g., /services).
- The parent item, if it's a submenu.
You can drag and drop items to reorder or nest them as needed.
In addition to your main navigation, consider adding:
- Footer menus for links like Privacy Policy, Contact or Terms of Use.
- Utility menus for login links, language switchers or search.
These secondary menus can be managed just like your main navigation.
Enhancing your site with themes, modules and blocks
Once your content and structure are in place, it’s time to customize the look and functionality of your Drupal site.
Customizing appearance with themes
Drupal themes control how your site looks and there are three types:
- Core themes: An example of a core theme is the default Olivero theme. It is modern, accessible and mobile-friendly, which is great for most beginner sites. It’s maintained by the Drupal project team and is very stable and well-tested.
- Contributed themes: These are created by the community and shared on Drupal’s theme repository. They often offer special designs or features that the core themes don’t have.
- Custom themes: A custom theme is one you (or a developer) build specifically for your site, usually by modifying an existing theme or creating new templates. They let you get exactly the look you want (for example, to match corporate branding), but they require coding.
You can search for other themes by going to the Drupal themes repository. There are many to choose from – from base themes (like Bootstrap or Zen) to fully-designed themes for various industries.
After finding a suitable theme for your site, you can either upload it yourself manually or use Composer.
Changing the theme manually
- Download your desired theme (in .tar.gz or .zip format) from Drupal.org.
- Extract the theme archive.
- Upload the extracted theme folder to your site's /themes directory (or /themes/contrib for contributed themes).
- After uploading, go to Appearance in the Drupal admin interface. The new theme should now appear under the Uninstalled themes or Disabled themes section.
- Click Install and set as default to activate it.
It’s good practice to put contributed themes in a themes/contrib subfolder and custom ones in themes/custom to keep things organized.
You can also activate the new theme with Drush if you’re comfortable with the command line. Run:
drush theme:enable theme_name
drush config-set system.theme default theme_name
But the UI method above works fine for beginners.
Using Composer
If your site is managed with Composer, run:
composer require drupal/THEME_NAME
Replace THEME_NAME with the machine name of the theme.
Composer will fetch the theme code and place it in your project’s themes/contrib directory.
After Composer finishes, clear the Drupal cache, then install and set the theme as default via the Appearance page in your admin interface or Drush (just like we did in the previous manual method).
By the way, Drupal also allows you to use a different theme for the administrative areas of your website. This can be helpful as admin themes are often designed for better usability when managing content.
Expanding functionality with modules
Modules in Drupal are like plugins. They add or extend features and just like themes, modules fall into three categories:
- Core modules: Pre-installed with Drupal (e.g., the User module for role management).
- Contributed modules: Community-developed additions from Drupal.org (e.g., Pathauto for URL automation).
- Custom modules: Tailor-made for specific projects by you or developers.
And to install a module, again, just like with Themes, you can do it manually or using Composer:
Adding a new module manually
- Download your desired module.
- Upload the module’s folder into the modules directory (usually /web/modules/contrib/ or similar).
- Go to the Extend tab, find the module in the list, check it and click Install at the bottom of the page.
Using Composer
Use this command:
composer require drupal/MODULE_NAME
Replace MODULE_NAME with the project name (e.g., pathauto).
Then, go to the Extend tab, check the module from the list and click Install. Alternatively, you can use Drush:
drush pm:enable MODULE_NAME
Using blocks to arrange layout
Blocks are chunks of content you can place in specific regions of your theme – like headers, sidebars or footers. Drupal provides default blocks like search, menus and login forms, but you can also create custom blocks.
For beginners, the simplest way to create and manage blocks is through Drupal’s administrative interface:
- Navigate to Extend, search for Block Content and install it.
- Go to Content > Blocks > Add Content Block.
- Fill in the fields.
- Click Save.
- Navigate to Structure > Block Layout.
- Select a theme (e.g., Olivero) and click Demonstrate Block Regions to visualize regions.
- Choose a region (e.g., "Sidebar") and click Place Block.
- Search for your custom block (e.g., "Welcome Message") and configure its title and visibility.
- Click Save Block.
You can then use the Visibility tab in the block’s configuration to show/hide on specific pages or restrict by user roles or languages.
Accelerate your Drupal success with Pantheon’s beginner-friendly platform
Building your Drupal website is just the beginning; making sure it runs smoothly and grows with you is where Pantheon truly shines.
Pantheon offers an optimized environment for Drupal that’s perfect for beginners and pros alike, offering:
- Dev, Test, Live environments, where you can safely develop and test new features in staging environments before pushing them live.
- Multidev, which spins up additional development environments for testing, collaboration or content previews.
- Automated backups with one-click restore to protect your site from accidental data loss.
- High-performance infrastructure with built-in caching, a global CDN and container-based architecture to ensure your Drupal site loads fast anywhere in the world.
- Integrated Git version control to help you track changes and roll back when needed, without touching a command line.
- New Relic to help you monitor your site’s performance and troubleshoot issues proactively.
Even if you’re just getting started with Drupal, Pantheon gives you tools that would normally require complex setup and maintenance. And as your skills and needs grow, Pantheon scales with you, whether you're managing one site or a whole portfolio.
Don’t let technical challenges hold you back – get started with Pantheon today and see how effortless building and managing your Drupal site can be!

