Resources and Insights
Image


Filters

Content Type
Topics
Install WordPress with WP-CLI: Step-by-Step Guide
Installing WordPress manually can be time-consuming. You have to download files, create a database, configure settings and go through the web installer. But with WP-CLI (WordPress Command Line Interface), you can install WordPress much faster using just terminal commands.
This guide will walk you through the step-by-step process of installing WordPress with WP-CLI. If you’re managing multiple WordPress sites or working on local development, WP-CLI can save you a lot of time and streamline your workflow.
And if you’re using Pantheon, you don’t need to go through any of the steps in this article to set up WP-CLI manually – it comes pre-installed and ready to use right from the get-go!
But if you want to understand how WP-CLI works or need to install WordPress on another environment, this guide will cover everything you need to know!
Why use WP-CLI for WordPress installation
WP-CLI is a powerful tool for managing WordPress from the command line. Instead of clicking through installation steps in a browser, you can execute a few commands and have WordPress up and running in seconds.
Here’s why many developers and site administrators prefer WP-CLI for installing WordPress:
- Faster installation: WP-CLI eliminates the need to download WordPress manually, set up a database through a control panel and configure files one by one. Everything can be done in a few quick commands.
- Automated and scriptable: Because WP-CLI runs in the terminal, you can script installations, making it easy to set up multiple WordPress sites without repeating manual steps. This is especially useful for agencies, developers and teams managing several sites.
- No browser or UI dependency: Unlike the traditional installation process, which requires a web browser, WP-CLI can be used directly on the server. This is especially useful when:
- Working on headless servers that don’t have a graphical interface.
- Managing remote installations where GUI-based access is slow or unavailable.
- Installing WordPress on cloud environments or VPS servers via SSH.
- WordPress multisite (WPMU) management: WordPress multisite is a feature that allows multiple sites to run under a single installation. Managing multisite installations via a web UI can be complex, but WP-CLI simplifies this:
- You can easily enable multisite mode without editing the wp-config.php file.
- It supports both subdomains and subdirectories.
- It’s ideal for agencies, universities and businesses managing multiple sites.
Installing WordPress via WP-CLI: Step-by-step guide
If you're not using Pantheon (where WP-CLI is already installed for you), follow these steps to install WordPress using WP-CLI on your own server or local environment:
Step 1: Ensure your server meets requirements and installing WP-CLI
Before installing WordPress, ensure your server has:
- PHP (at least 7.4+)
- MySQL or MariaDB
- WP-CLI Installed
If you haven’t installed WP-CLI yet, follow these steps:
- Download the Phar file:
curl -O https://raw.githubusercontent.com/wp-cli/builds/gh-pages/phar/wp-cli.phar- Make it executable:
chmod +x wp-cli.phar- Move it to a global location (optional):
sudo mv wp-cli.phar /usr/local/bin/wp- Test:
wp --infoYou should see information about WP-CLI, PHP and the operating system.
Step 2: Navigate to your web directory
When you install WordPress, you need to put its files in the correct folder where your web server (like Apache or Nginx) will look for them. This folder is called the "web root" – navigate to it like so:
cd /var/www/htmlReplace /var/www/html with your actual web root directory.
Step 3: Download the WordPress core files
Run the following command to download the latest WordPress core files:
wp core download --locale=en_USThis:
- Downloads the latest WordPress version.
- Extracts it into the current directory.
- Removes the archive file after extraction.
- --locale=en_US specifies the language (change as needed, e.g., --locale=fr_FR for French). If you want to overwrite existing files, add --force.
Step 4: Create a database for WordPress
Log into MySQL (assuming you have MySQL root access):
mysql -u root -pThen, create a database:
CREATE DATABASE wordpress_db;
CREATE USER 'wp_user'@'localhost' IDENTIFIED BY 'your_password';
GRANT ALL PRIVILEGES ON wordpress_db.* TO 'wp_user'@'localhost';
FLUSH PRIVILEGES;
EXIT;
What this does:
- Creates a database (wordpress_db) for WordPress to store data.
- Creates a user (wp_user) with a secure password.
- Grants this user full access to the wordpress_db database.
Step 5: Configure WordPress with the database
To connect WordPress to the database we just created, we need to set up the configuration file, wp-config.php:
wp config create --dbname=wordpress_db --dbuser=wp_user --dbpass=your_password --dbhost=localhostWhen you run this command, WP-CLI creates the wp-config.php file and fills it with the correct database information. Here’s what each part does:
- wp config create tells WP-CLI to generate the wp-config.php file.
- --dbname=wordpress_db is the name of the database WordPress should use (replace with your actual database name).
- --dbuser=wp_user is the database username WordPress should use (replace with your actual MySQL user).
- --dbpass=your_password is the password for that MySQL user (replace with your actual password).
- --dbhost=localhost is the location of the database. localhost means it is on the same server.
Now, if you check your WordPress folder, you will find a new file named wp-config.php. This file allows WordPress to communicate with the database.
By default, WordPress uses wp_ as the table prefix. Changing this default prefix to something else makes it harder for hackers to attack your database. Just add --dbprefix=mywp_ at the end of the above command to change the prefix for database tables (change mywp_ to your preferred prefix).
Step 6: Install WordPress
Now, we need to perform the actual WordPress installation. Run the install command and pass in your site details:
wp core install \
    --url="https://example.com" \
    --title="My WP-CLI Site" \
    --admin_user="admin" \
    --admin_password="StrongP@ssw0rd" \
    --admin_email="admin@example.com"
Here’s what these parameters mean:
--url Your site URL (replace with your domain).
--title Your WordPress site title.
--admin_user The username for the administrator account.
--admin_password The password for the administrator account.
--admin_email The email associated with the administrator.
If everything goes well, WP-CLI should confirm a successful installation.
Step 7: Verify the installation
Check if WordPress is working by running:
wp core versionThis should return the installed WordPress version.
You can also double-check by visiting your domain on the browser. You should see the default WordPress “Hello World” homepage.
To log into the admin dashboard, go to:
https://example.com/wp-adminThen, enter the credentials you specified (admin and StrongP@ssw0rd in the example).
And that’s it – your WordPress installation is complete!
How to use WP-CLI
Keeping WordPress updated
Keeping WordPress updated is critical for security and performance. Here’s how you do it in seconds. Use the following command to update WordPress core:
wp core updateOnce that’s done, don’t forget to update the database:
wp core update-dbThis ensures all new WordPress features are applied properly.
Managing users
If you’ve ever been locked out of your own WordPress site (oops!), WP-CLI can save you:
- List all users:
wp user listYou'll see a table with user IDs, usernames, emails and roles. This is super handy when you need to identify the admin user ID.
- Create a new admin user: Say you forgot your admin credentials or you just need a new admin:
wp user create newadmin newadmin@example.com --role=administrator --user_pass="StrongPassword"Now, you have a fresh admin user – no need to reset your password!
- Change a user’s password:
wp user update admin --user_pass="NewStrongPassword"No need for the "Forgot Password" link.
- Delete a user and reassign posts:
wp user delete 3 --reassign=1This deletes the user with ID 3 and transfers their posts to user ID 1. No more orphaned content!
Plugin management: install, update and troubleshoot
Managing plugins via WP-CLI is so much faster than clicking through the WP admin dashboard:
- List installed plugins:
wp plugin listThis will show all installed plugins, whether they're active, inactive or need updates.
- Install and activate a plugin:
wp plugin install woocommerce --activateChange woocommerce with the name of whatever plugin you want to install and activate.
- Deactivate a plugin:
wp plugin deactivate akismetChange akismet with the name of whatever plugin you want to deactivate.
- Delete a plugin completely:
wp plugin delete akismetAgain, change akismet to the name of the plugin you want to delete.
- Update all plugins at once:
wp plugin update --allAlso, take care when working with WordPress multisite – you’ll need to consider whether a command applies network-wide or only to a specific site. If you don’t use the --network flag, the command will apply to the specific subsite where WP-CLI is being run. If you use it, the command will apply to all sites across the network.
For example, to install a plugin for a single site within a multisite:
wp plugin install yoast-seo --activateThis installs and activates yoast-seo for the current subsite.
To install a plugin network-wide, you’ll need to use --network:
wp plugin install yoast-seo --activate --networkThis installs and activates yoast-seo across all sites in the network.
Similarly, checking a plugin’s details can be done with:
wp plugin get woocommerce --networkThis ensures you're retrieving the plugin information at the network level.
Theme management: Install, switch and clean Up
Themes can be tricky when switching manually, but WP-CLI makes it easy:
- List installed themes:
wp theme list- Activate a new theme:
wp theme activate twentytwentyfourChange twentytwentyfour with the name of the theme you want to use.
- Delete an old theme:
wp theme delete twentytwenty- Update all themes:
wp theme update --allDatabase: Backup, optimize and fix issues
Your WordPress database is the heart of your site, so let’s take good care of it:
- Backup the database:
wp db export backup.sqlThis creates a backup file (backup.sql) in your current directory.
- Import a database backup:
wp db import backup.sqlThis restores the database from a previous backup.
- Optimize and repair database:
wp db optimizewp db repairManaging content: posts, media and more
Ever needed to bulk delete posts or upload images without the WordPress dashboard? Here’s how:
- List all posts:
wp post list --fields=ID,post_title,post_statusThis gives you a neat table of all your posts.
- Create a new post:
wp post create --post_title="My New Post" --post_content="This is my post content." --post_status=publish- Bulk generate dummy posts:
wp post generate --count=10 --post_status=publishThis creates 10 random published posts, useful for testing or populating a staging site.
- Delete a post:
wp post delete 15This removes post ID 15.
- Upload an image:
wp media import /path/to/image.jpg --title="Cool Image"Debugging and maintenance mode
Things go wrong. Here’s how WP-CLI helps you fix issues fast.
- Enable debug mode:
wp config set WP_DEBUG true --raw
wp config set WP_DEBUG_LOG true --raw
This helps find PHP errors and logs them.
- View debug log:
wp eval "readfile(WP_CONTENT_DIR.'/debug.log');"- Fix the “stuck in maintenance mode" issue:
rm .maintenance
wp maintenance-mode deactivate
Alternative installation methods
Via Pantheon – WordPress hosting provider
Image
Pantheon is designed for developers, agencies and enterprises that need a powerful and scalable hosting environment. Unlike traditional shared hosting or simple one-click installers like Softaculous, Pantheon provides a containerized infrastructure optimized for speed, security and smooth development workflows – here’s how:
- It operates on the Google Cloud Platform, ensuring high performance and reliability.
- It has built-in caching with Varnish and Redis.
- It includes a global CDN for faster load times.
- It provides free SSL (HTTPS) and DDoS protection for enhanced security.
Pantheon provides an easy and optimized WordPress installation process:
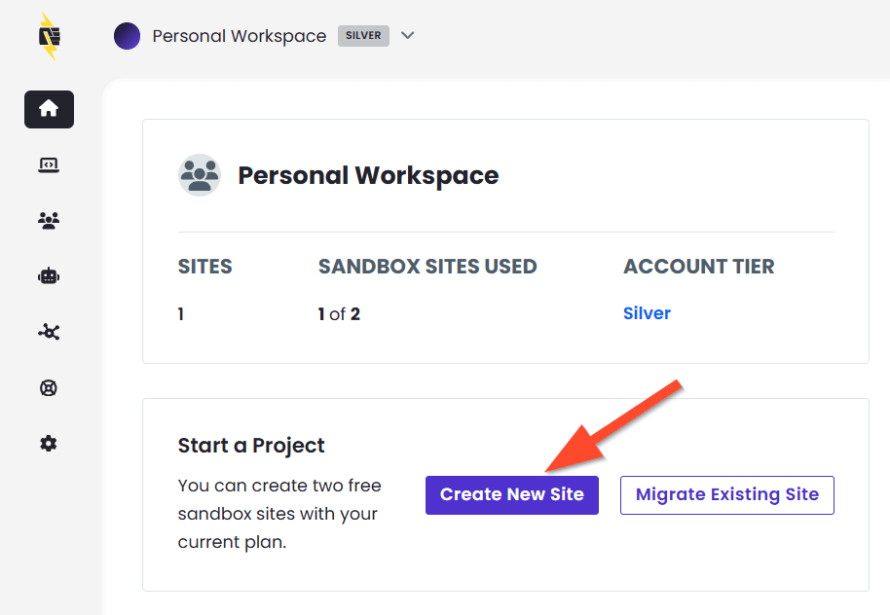
- Go to Pantheon.io and create an account.
- Once logged in, click Create New Site.
Image
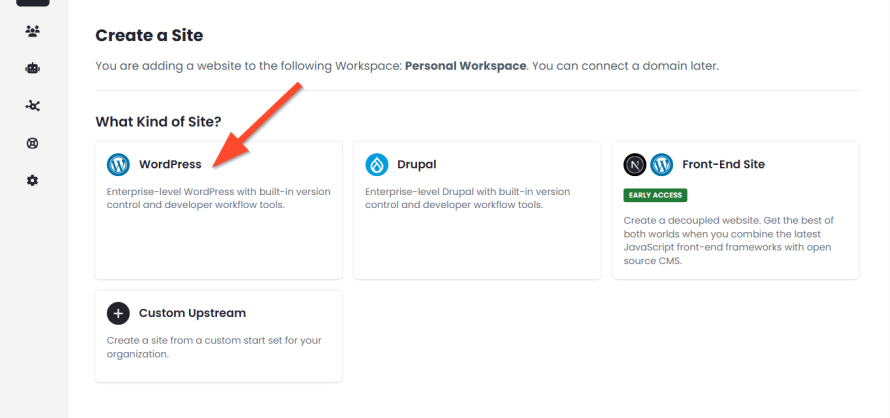
- Choose WordPress as your CMS.
Image
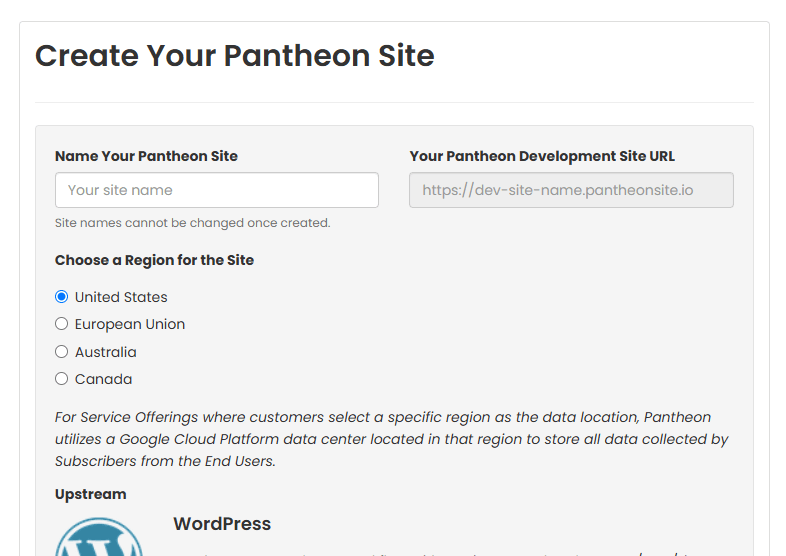
- Enter a site name (e.g., mywordpresssite).
Image
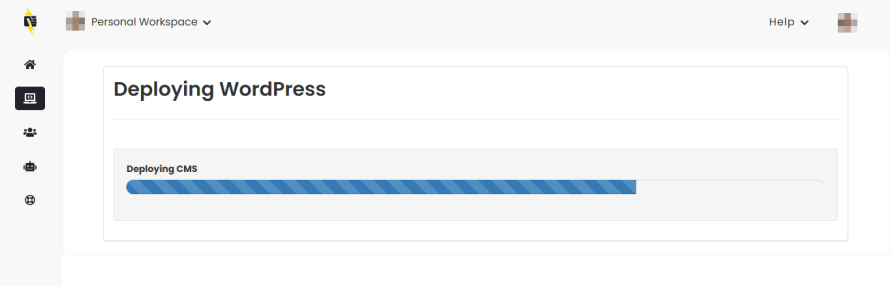
- Click Create Site. Then, Pantheon will automatically set up a WordPress installation. You won’t need to create a database manually – Pantheon handles it.
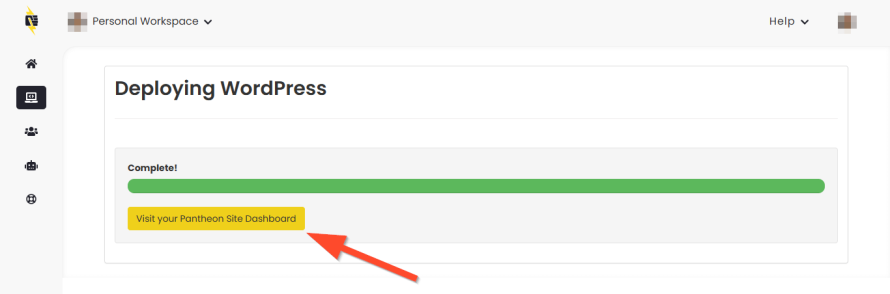
- Once ready, click Visit your Pantheon Site Dashboard.
Image
- Click Visit Development Site.
Image
- Choose your language, enter site details (site name, admin username, password), then click Install WordPress.
And that’s how quick and easy it is! You can now log into the WordPress dashboard (/wp-admin).
Ultimately, Pantheon is an excellent choice for developers and teams who need a powerful, Git-integrated, multi-environment WordPress hosting solution.
Docker (Containerized Installation)
Image
Docker is a containerization platform that allows you to create, deploy and run applications in isolated environments called containers. A container packages everything an application needs to run – code, dependencies, libraries and configuration files – so it runs the same way across different systems.
Think of Docker containers like mini virtual machines, but much more lightweight and efficient.
Using Docker for WordPress provides several benefits over traditional installation methods:
- Consistency across environments: Whether you're working on Windows, Mac or Linux, your WordPress setup remains the same. No more "it works on my machine" issues.
- Easy deployment and portability: Once you set up your WordPress container, you can easily move it to another server without reconfiguration. This makes migrating WordPress between local development and production servers much easier.
- Faster and isolated setup: No need to manually install Apache, MySQL or PHP. Your WordPress installation is isolated from other applications on the server.
- Easy to recreate: If something goes wrong, you can delete and rebuild the entire WordPress setup in seconds with:
docker-compose down
docker-compose up -d- No conflicts with system dependencies: PHP, MySQL and Apache versions are inside the container, so they won’t interfere with your local system.
Automated environment setup: No need to manually configure Apache/Nginx, MySQL or PHP – just run:
docker-compose up -d
A typical Docker-based WordPress setup consists of:
- A WordPress container (for WordPress files and PHP).
- A MySQL (or MariaDB) container (for the database).
- An optional phpMyAdmin container (to manage the database).
- A network bridge to connect them.
- Each component runs independently, but they work together.
This approach is best for developers who want to run WordPress in an isolated environment.
Bedrock
Image
Bedrock is a modern WordPress boilerplate that improves the structure, security and maintainability of a WordPress project. It transforms WordPress from a traditional monolithic application into a dependency-managed, version-controlled project, making it an excellent choice for developers and teams.
Instead of the default WordPress structure, Bedrock introduces a Composer-based workflow, better security practices and environment-specific configurations. However, Bedrock is not suited for beginners or those looking for a basic WordPress install.
TL;DR: Which one should you use?
|
Feature |
Pantheon |
Docker | Bedrock |
| Hosting |
✅ Managed |
❌ Self-hosted |
❌ Self-hosted |
| Ease of use |
✅ Beginner-friendly |
❌ Requires Docker knowledge |
⚠️ Moderate setup |
| Security |
✅ Built-in |
⚠️ Up to your config |
✅ Improved security |
| Scalability |
✅ High |
✅ High |
⚠️ Depends on hosting |
| Development workflow |
✅ Git, Composer |
✅ Isolated environments |
✅ Modern dev setup |
| Best for |
DevOps & managed WordPress hosting |
DevOps & cloud deployments |
Structured WordPress development |
Enhance WordPress sites with Pantheon
Since WP-CLI is pre-installed on Pantheon, there’s no need to worry about setup or compatibility issues. You can start managing your WordPress site right away without extra configuration.
Terminus is Pantheon’s command-line interface that allows you to interact with your Pantheon-hosted sites just like WP-CLI. In fact, Terminus integrates with WP-CLI, making it easy to run WP-CLI commands on your Pantheon site without SSH-ing into the server manually.
Instead of logging into your server via SSH, you can run WP-CLI commands directly through Terminus. For example, to list installed plugins on your Pantheon site, use:
terminus remote:wp site-name.dev -- plugin listHere are some other useful Terminus-WP-CLI commands:
- Update all plugins:
terminus remote:wp site-name.dev -- plugin update --all- Check WordPress core version:
terminus remote:wp site-name.dev -- core version- Clear the WordPress cache:
terminus remote:wp site-name.dev -- cache flushThis integration eliminates the need for complex server management and gives you direct control over your WordPress site from your local terminal.
Get started with WordPress and Pantheon today
As you’ve seen, whether you're handling multiple WordPress sites, automating workflows or simply looking for a faster way to get up and running, WP-CLI streamlines the process.
But if you want an even smoother experience, Pantheon takes WordPress hosting to the next level. With WP-CLI pre-installed, built-in developer tools like Terminus and a high-performance infrastructure, Pantheon removes the hassle of manual setup and lets you focus on building and optimizing your site.
Still unsure if WP-CLI is for you? Watch our webinar on getting started!

